Entra ID Setup

This guide will help you successfully integrate Microsoft Entra ID with Asset Panda.
NOTE: You will be copying and pasting values between Microsoft Entra ID and Asset Panda during this integration. It is recommended that you paste all values into a text (.txt) file so you do not lose them in the event of a system timeout.
Log in to Accounts
Asset Panda
1. Open a new tab, and then navigate to Asset Panda at https://login.assetpanda.com.
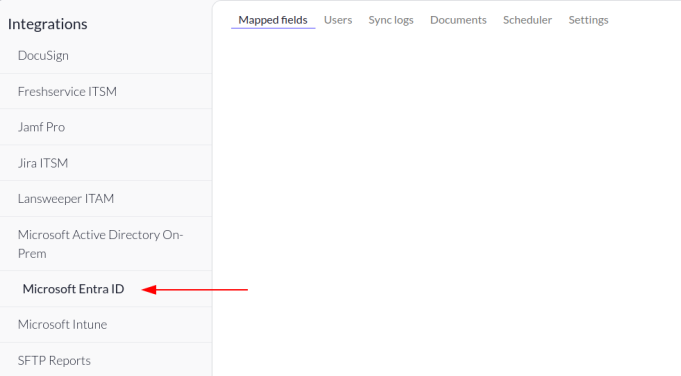
2. Log in to your account, click the Settings  icon, and then select Integrations.

3. Select Microsoft Entra ID from the list of Integrations.

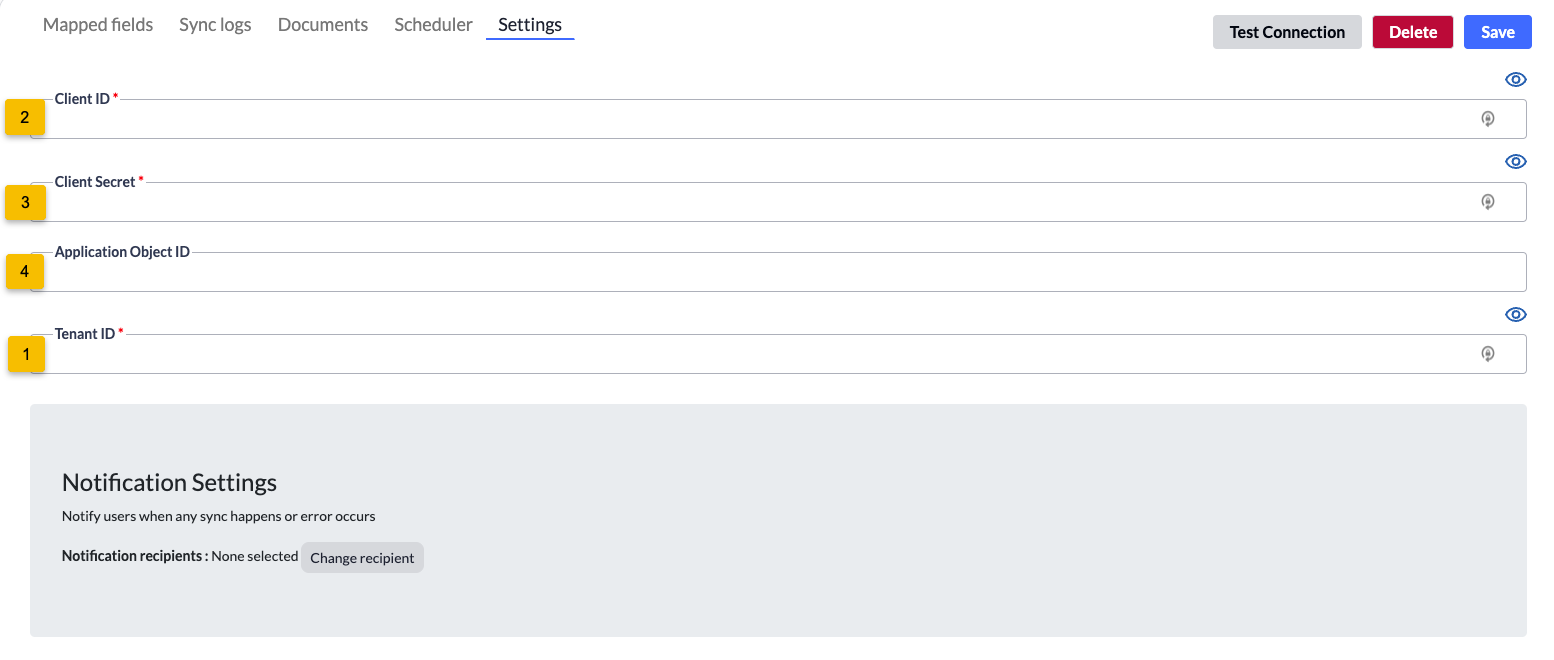
4. The Microsoft Entra ID Settings page displays. Keep this page and tab open, as you will refer to it again throughout the following steps.

Microsoft Entra ID
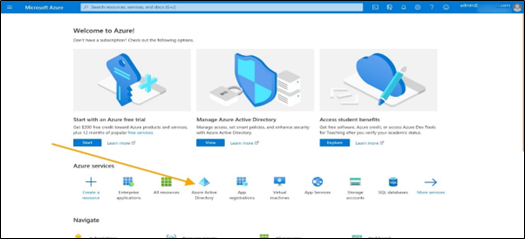
1. Open a second tab, and then navigate to Azure at https://portal.azure.com.
2. Log into your account, and then click Microsoft Entra ID.

View Tenant
1. Navigate back to or log into your Microsoft Entra ID Account. (If you’re already logged in, click Home , located within in the top, left corner of your screen.)
2. Select Microsoft Entra ID.

Your default Tenant Information displays.

3. Click Switch Tenant if you would like to use a different tenant, and then select a tenant from the list.

4. Click Switch.

5. Verify the tenant name (located in the top, right corner below your email id).
6. Click the copy icon to copy the Tenant ID.

7. Navigate back to Asset Panda, and then paste the Tenant ID into the Tenant ID field (#1).

App Registration
1. Navigate back to your Microsoft Entra ID account, and then click App registration .

2. Click New registration .

3. Complete the following fields:
- Name
- Supported account types – Select Accounts in this organizational directory only (AssetPanda only – Single tenant)
4. Click Register .

5. Copy the Application (Client ID) .

6. Navigate back to your Asset Panda account, and then paste the Application (Client ID) into the Client ID field (#2).

Add API Permissions
Complete the following steps to add your API permissions. (See the Delegated and Applications Permissions Table at the bottom of this section for more information about the permissions listed here.)
1. Navigate back to your Microsoft Entra ID account, and then click API Permissions.
2. The User Read permission should already be contained within the list.
3. From the Configured permissions section, select Add a permission.

4. From the Request API permissions page, select Microsoft Graph to add more permissions.

5. Select Delegated permissions .

6. Expand OpenId permissions , and then select the following values:
- profile
- offline_access

7. Click Add Permissions. The Configured permissions section displays again.
8. Click Add a permission to add more permissions.

9. Select Microsoft Graph again, and then select Application permissions .

10. Navigate to Application , expand the menu, and then select:
- Application.Read.All
11. Navigate to Directory , expand the menu, and then select:
- Directory.Read.All
12. Navigate to Group , expand the menu, and then select:
- Group.Read.All
13. Navigate to User , expand the menu, and then select:
- User.Read.All
14. Click Update permissions . A list of your selected permissions should display, as shown below.

15. Click Grant admin consent for Default Directory to confirm that all permissions have admin consent.

16. Click Yes to grant consent.

17. Confirm that the Status column displays the granted, admin permissions.

Delegated and Applications Permissions Table
|
Permission |
Application/Delegated |
Optional/Required |
Function |
|
Application.Read.All |
Application | Optional |
Reads all applications. Grants permission to read all applications and service principles. |
|
Directory.Read.All |
Application |
Required |
Reads directory data. Grants permissions to read all users within the directory. |
|
|
Delegated |
Required |
Maintains access to the data you have been given. Grants permission to gather email addresses for Asset Panda to create user accounts. |
|
Group.Read.All |
Application |
Required |
Reads all groups. Grants permission to Asset Panda, allowing us to read groups to make sure mapping users are guided to the correct Asset Panda groups as setup. This allows for users to be mapped and filtered correctly. |
|
Offline_access |
Delegated | Required |
Maintains access to the data you have provided. Grants permission to read and update user data, even when user is not currently using the application. |
|
Profile |
Delegated |
Required |
View a user’s basic profile. Grants permission to read a basic set of profile properties for other users in your organization on behalf of the signed-in user. This includes display name, first and last name, email address, open extensions, and photo. Also allows the application to read the full profile of the signed-in user. |
|
User.Read.All |
Application | Required |
Read the profiles of all users. Grants permission to read the full set of profile properties, reports, and managers of other users within your organization. |
|
User.Read |
Delegated |
Optional |
Read the basic profiles of all users. Grants permission to read a basic set of profile properties of other users within your organization on behalf of the signed-in user. This includes display name, first and last name, email address, open extensions, and photo. Also allows the application to read the full profile of the signed-in user. |
Create Application Secret
This section will guide you through the steps of creating an application secret that will be used within Asset Panda.
1. Click Certificates &secrets .

2. Click New client secret .

3. Enter the following details within the Client secrets window:
- Description
- Expires - Select the maximum expiration option.
4. Click Add .
5. Copy the Value shown on your screen. You will not be able to do this again after this step.

6. Navigate back to your Asset Panda window, and then paste the Value within the Client Secret field (#3).

Enterprise Application
To enable Asset Panda to sync with Microsoft Entra ID users, you must first enable the application within Microsoft Entra ID.
1. Navigate back to your Microsoft Entra ID account.
2. Begin to type Enterprise within the Search box, and then select Enterprise Applications .

3. Locate your application, and then copy the Object ID .

4. Navigate back to your Asset Panda account, and then paste the Object ID within the Application Object ID field (#4).

Final Steps
The following fields should now contain information from the previous steps:
- Client ID
- Client Secret
- Application Object ID
- Tenant ID
To complete the setup process:
1. Click Save on the top right corner.
2. You can select Test Connection after saving to see if your credentials are correct.

Microsoft Entra ID is now ready to use with your account. You can now copy users, create field maps, and set schedules.
Mapped Fields
Complete the steps in this section to map (and sync) to specific groups.
NOTE: To prevent the duplication of records, the following fields must be defined as unique and not include a blank value:
- Users - link with the Email field
See Unique Rule for more information about unique fields.
1. Click the settings icon  , and then select Integrations.

2. Navigate to the Microsoft Entra ID section, and then click Add new mapped field.

3. Select the Entity (from within Asset Panda) and External Entity (from within Microsoft Entra ID). Also select the fields you wish to Map from Microsoft Entra ID and Map to Asset Panda.

4. Click Save.
You are redirected back to the Microsoft Entra ID page.
5. Scroll back to the Mapped Fields section, and then click Sync Now . (See Sync Individual Record below if you wish to sync an individual record rather than a group.)

6. Your items begin to synchronize and you will receive an email once it is complete.
NOTE: All sync information can be viewed through the Sync Logs at the bottom of the Microsoft Entra ID page.
Sync Individual Record
If you wish to sync an individual record:
1. Click Actions when viewing a record.
2. Select Sync , and then select Sync all users with Microsoft Entra ID .

NOTE: All sync information can be viewed through the Sync Logs at the bottom of the Microsoft Entra ID page.