This article will take you through the setup between ConnectWise and Asset Panda. Please note that we do not currently support ConnectWise Control® On-Premise. We currently support ConnectWise Control in the cloud only.
ConnectWise API Credentials
You must have your ConnectWise API credentials before you begin the setup process. These credentials are provided from ConnectWise.
(The following API information is provided by ConnectWise. Click here for more information.)
To obtain your ConnectWise API credentials:
1. Log into your ConnectWise account.
2. Click System, and then select Members.
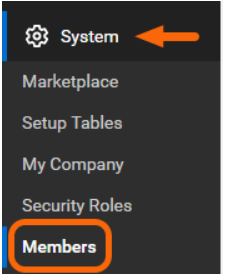
3. Select API Members.

4. Click the + sign to add a new API member.

5. Enter all of the required information, as shown below.

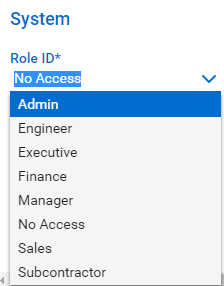
6. Make sure that the Role ID is set to Admin. This will help to ensure proper ticket generation. (See the Limited Access Permissions Tables at the end of this document if you wish to provide only minimum permissions.)
7. Click Save once you have entered all of the required fields.
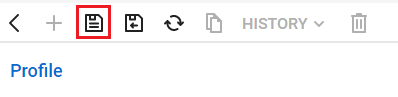
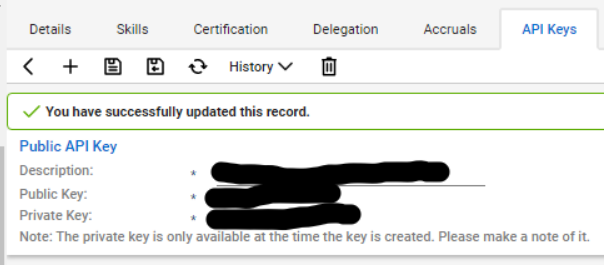
8. Click API Keys.

9. Click the + sign to add a new API key.

10. Use the Description field to enter a description for the API key, and then click the save icon (shown below).
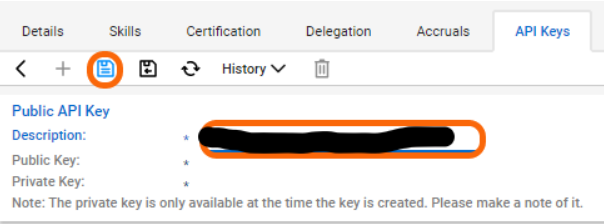
Both your Public Key and Private Key are displayed.
Asset Panda and ConnectWise Integration
The Asset Panda and ConnectWise integration is a two-way push, meaning that it is pulling data from ConnectWise, as well as pushing data from Asset Panda into ConnectWise.
NOTE: Asset Panda does not have control of ConnectWise's API. As a result, we can push data into ConnectWise in real time but we cannot control the data that is pushing the opposite direction.
To set up your integration:
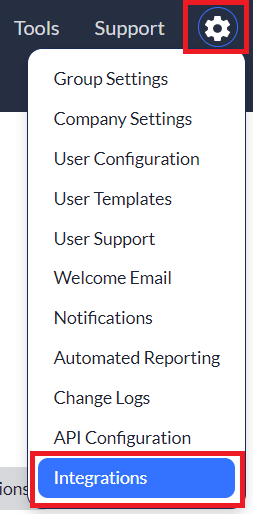
1. Log into your Asset Panda account.
2. Click your settings  icon, select Integrations.
Settings
Use the following instructions to configure your mapped fields within Asset Panda.
1. Select ConnectWise Manage from your list of integrations, and then select the Settings tab.

2. Enter the following ConnectWise API credentials:
- URL: The URL is the URL used to log into your specific ConnectWise account.
- Company Name: Enter the company name.
- Public Key and Private Key: Enter the ConnectWise API public and private keys (obtained within the ConnectWise API Credentials section).
3. Select Save.
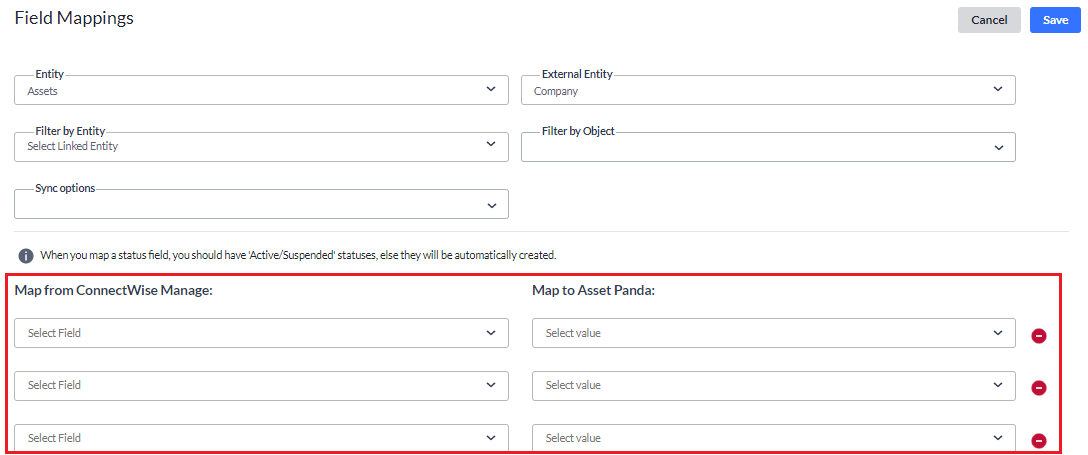
Mapped Fields
1. Select the Mapped Fields tab.
![]()
2. Select the Add new mapped field button to begin mapping your fields.
Use the following drop-down menus to:
3. Select the Entity (from within Asset Panda) and External Entity (from within ConnectWise).
4. Use the Filter by Entity (selects your group) and Filter by Object (selects your group object) drop-down menus to select your filter by options.
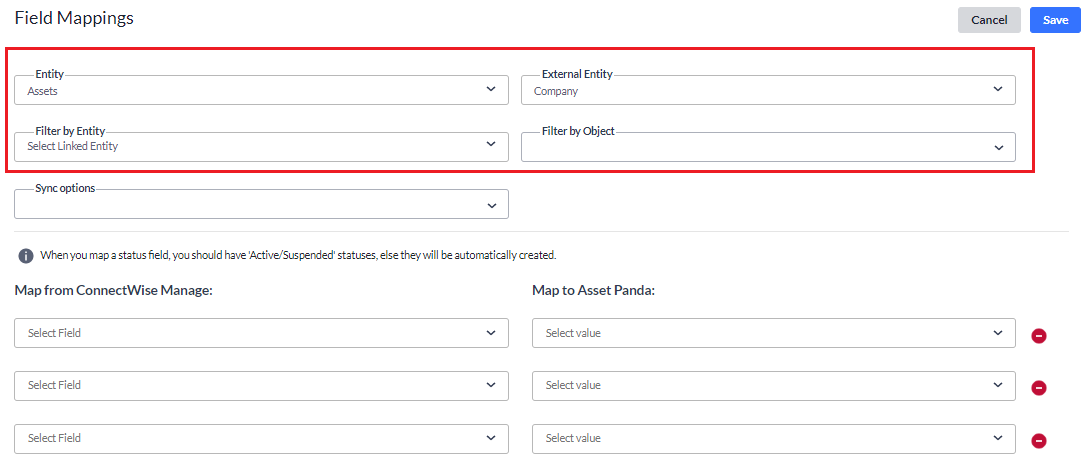
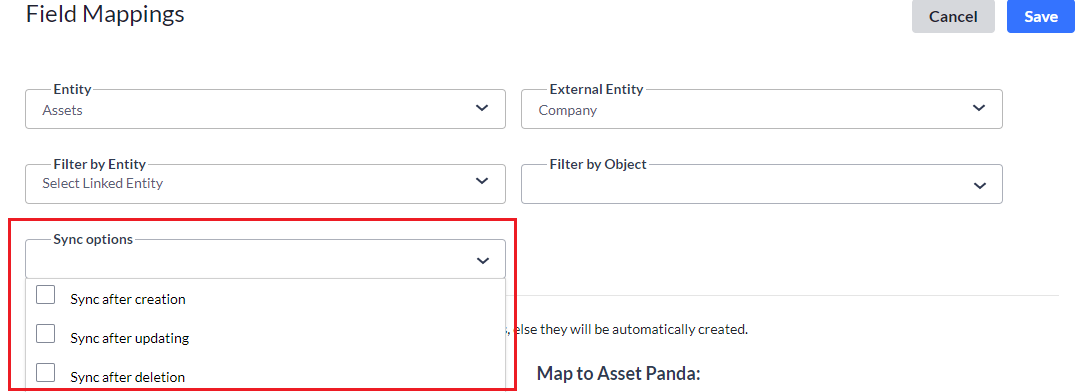
5. Use the Sync options drop-down menu to select the sync mode that best suits your needs.
NOTE: It is advised to check the Sync After Delete with caution. When checked, items deleted from Asset Panda will also be deleted from your ConnectWise account.
6. Select the fields you wish to Map from ConnectWise Manage and Map to Asset Panda.
NOTE: To prevent the duplication of records, the following fields must be defined as unique and not include a blank value:
- Users - link with the Email field
- Device (computer, mobile, and other devices) - link with the serial_number field
See Unique Rule for more information about unique fields.
7. Click Save to be returned back to your main Asset Panda ConnectWise page.
8. Re-select your Mapped Fields tab.
You will notice that some General Sync options such as General Sync - Download and General Sync - Upload are now available.

The General Sync - Download button pulls data from ConnectWise into Asset Panda.
The General Sync - Upload button manually pushes data from Asset Panda into ConnectWise.
You can also sync groups by selecting the group itself within Asset Panda.
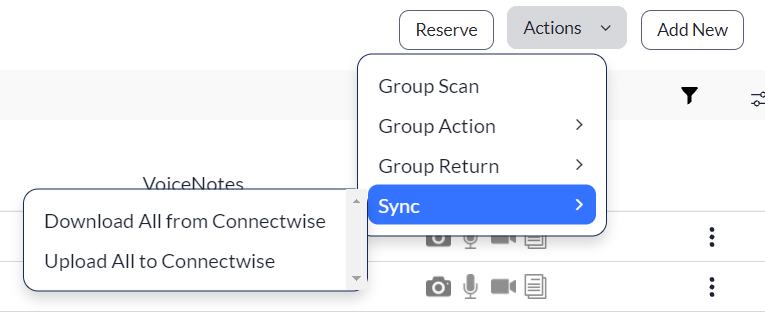
You will also see the option to download your data from ConnectWise or to upload from Asset Panda.
Sync Logs
Your Sync Logs store all your syncing information and are divided by year and month.
1. Click the Sync Logs tab, and then select your desired year and month to expand your logs for the specified timeframe.
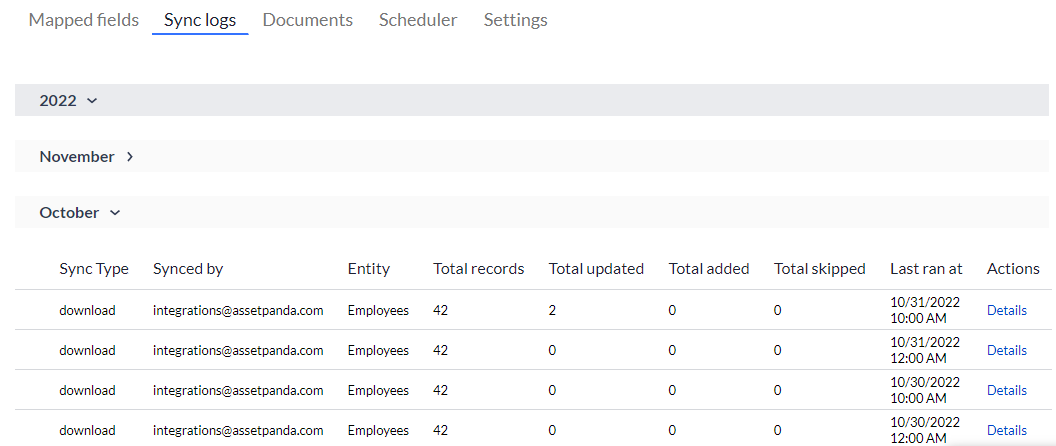
2. Click the Details link to view a more detailed log of sync information.
Schedulers
Use the Schedulers feature to set up automatic sync schedules. (You can choose when and how often your syncs occur.)
NOTE: A maximum of two schedules may be added at any given time. At least one must be deleted if you find the need to setup new schedules.
1. Click the Scheduler tab.
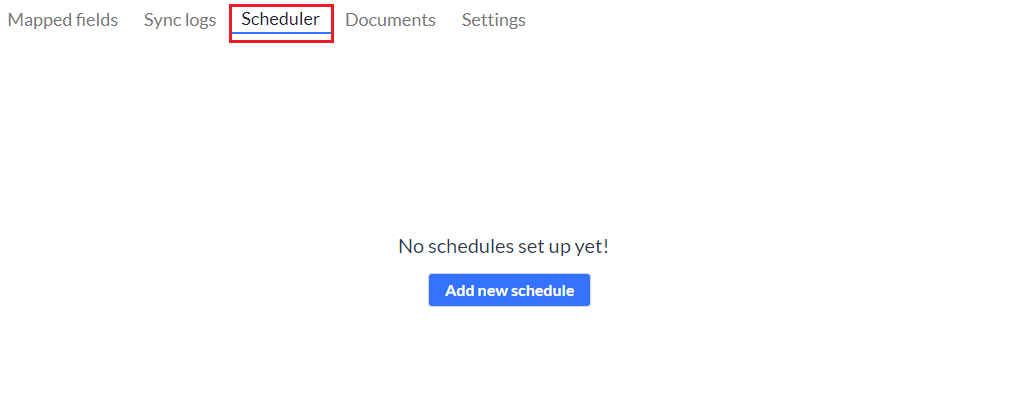
2. Click Add new schedule if you do not currently have any existing schedules.
The Add ConnectWise Schedule page displays.

3. Enter your preferred scheduler name into the Name field.
This is a required field.
4. Use the Schedule for field mapping drop-down menu to select the group you wish to sync to.
The groups included within this drop-down menu are pulled from fields you mapped within the Mapped Fields section. This is a required field.
NOTE: You must create a schedule for each group.
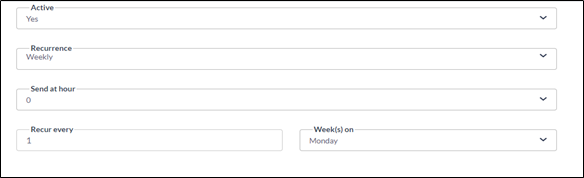
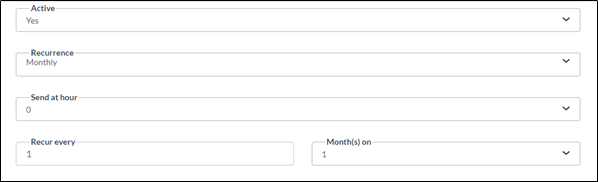
5. Use the Active drop-down menu to select Yes, and to activate your scheduler.
6. Use the Recurrence to select:
- Daily – Select Daily, the hour, and day of the week.

- Weekly – Select Weekly, the hour, the frequency, and day of the week.
- Monthly – Select Monthly, the hour, and the frequency (includes the frequency of the month such as every month, every other month, etc., and the day of the month).
- Yearly – Select Yearly, the hour, and the frequency (includes the specific month and day of the month you wish to schedule).
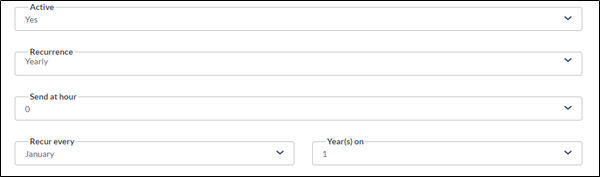
7. Use the Send at hour drop-down menu to select when you wish your schedules to send.
8. Click Save.
Your new schedules display.
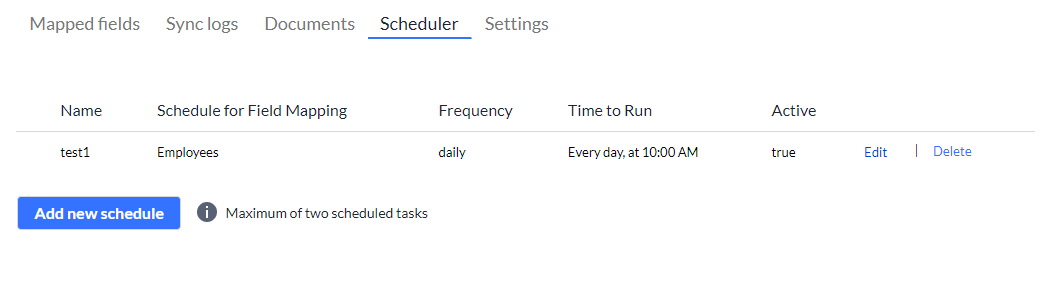
NOTE: There is currently a maximum of two scheduled tasks.
Limited Access Permissions Tables
You may wish to provide limited access permissions rather than those of administrator (as mentioned in step #6 of the ConnectWise API Credentials section). Use the following table to set permissions to an inquire (limited), versus administrator-level of permissions.
NOTE: All are required.
|
Companies |
|
Marketing |
|
Company Maintenance |
|
ConnectWise Campaign |
|
Company/Contact Group Maintenance |
|
Marketing Groups |
|
Configuration - Display Passwords |
|
Marketing Management |
|
Configurations (customize) |
|
Marketing Reports (customize) |
|
Contacts |
|
|
|
CRM/Sales Activities |
|
|
|
Import Contacts |
|
|
|
Manage Attachments |
|
|
|
Management |
|
|
|
Notes |
|
|
|
Reports (customize |
|
|
|
Surveys |
|
|
|
Team Members |
|
|
|
Tracks |
|
|
|
UserCentric |
|
|
|
Finance |
|
Procurement |
|
Accounting Interface |
|
Inventory Adjustments |
|
Agreement Invoicing |
|
Inventory Transfers |
|
Agreement Sales |
|
Product Billable Option |
|
Agreements (customize) |
|
Product Catalog |
|
Billing Rate Maintenance |
|
Product |
|
Billing Reconciliation |
|
Purchase Orders |
|
Billing View Time |
|
Purchasing Approvals |
|
Company Finance |
|
Purchasing Demand |
|
Expense Reimbursements |
|
Reports (customize) |
|
Financial Dashboard |
|
RMA Entry |
|
Invoice Approval |
|
RMA Processing |
|
Invoicing |
|
Serial Number Search |
|
Reports (customize) |
|
|
|
Project |
|
Sales |
|
Close Project Tickets |
|
Closed Opportunity |
|
Close Projects |
|
Opportunity |
|
Project Contacts |
|
Opportunity Finance |
|
Project Finance |
|
Reports (customize) |
|
Project Continued |
|
Sales Continued |
|
Project Headers |
|
Sales Dashboard |
|
Project Management |
|
Sales Funnel |
|
Project Notes |
|
Sales Order Finance |
|
Project Phase |
|
Sales Orders |
|
Project Product |
|
|
|
Project Reports (customize) |
|
|
|
Project Scheduling (customize) |
|
|
|
Project Teams |
|
|
|
Project Templates |
|
|
|
Project Ticket - Dependencies |
|
|
|
Project Ticket Tasks |
|
|
|
Project Tickets |
|
|
|
Service Desk |
|
|
|
Change Approvals |
|
|
|
Close Service Tickets |
|
|
|
CloudConsole |
|
|
|
ConnectWise Chat |
|
|
|
ConnectWise Control |
|
|
|
ITBoost |
|
|
|
Knowledge Base Approver |
|
|
|
Knowledge Base Creator |
|
|
|
Launch Remote Access |
|
|
|
Merge Tickets |
|
|
|
Print Service Signoff |
|
|
|
Reports (customize) |
|
|
|
Resource Scheduling (customize) |
|
|
|
Service Ticket - Dependencies |
|
|
|
Service Tickets |
|
|
|
Service Tickets - Finance |
|
|
|
SLA Dashboard |
|
|
|
Ticket Templates |
|
|