Active Directory
On-prem guide to Active Directory Setup
Active Directory (AD) stores user information and privileges. It can be integrated with Asset Panda to push users into our system. It is currently a one-way data push into Asset Panda, meaning that you won't modify any records inside of AD.
There are two separate workflows with the integration. These consist of the pulling of records into the employee group (so that you can check items out), and the pulling of records into the user configuration section (so they will be able to login to the system). You can do either or both. The choice is yours!
If you do choose to import user logins, you will need a separate AD group for each different level of user permissions. This will need to be configured by your company as Asset Panda does not have access to this.
NOTE: The following guide will assist you with the integration process however, you will need to contact your Implementation Specialist or the Support Team in order to have this integration activated on your Asset Panda account.
You will need the following system requirements/server environment to integrate AD with Asset Panda:
- Windows Server 2008-2025
- 1 GHz or faster processor
- 512 MB of RAM
- 1 GB of available hard disk space
Asset Panda Configuration
Before you begin installation, you must first properly configure your Asset Panda account.
You must first edit your Employees group, enabling it to accept the records. To do this:
NOTE: Your Employee group type may be named something different than ours.
2. Click the Edit link from within your Employees group.
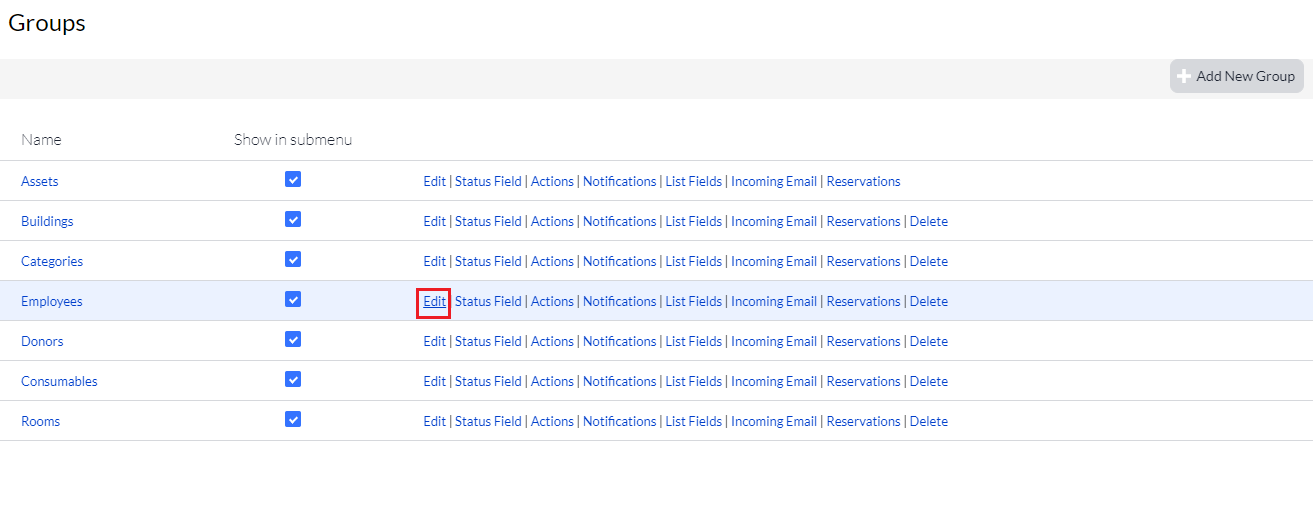
3. Scroll down to your Fields section and then click Add New Field.

4. Select Status from your Type drop-down menu to create a Status type field.
5. Select Set Options from your Limit List Option drop-down menu, and then enter Active, Inactive, and Delete from AD as shown below.
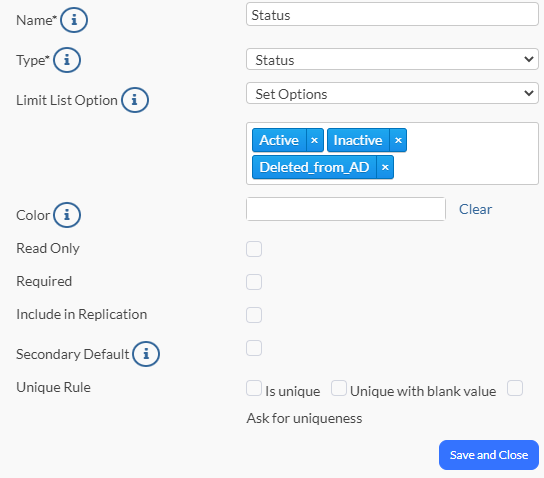
6. Click Save and Close to save your new field.
7. Create any other fields you wish to pull from AD. (The only field types that will work with AD are Text, Phone, Email, and Status.)
8. Note that you need to complete steps 8 , 9, and 10 only if you wish to also pull user logins over into Asset Panda.
To pull the user logins into Asset Panda, you will need to create a user template for each level of permission you wish to give those users pulled over from AD. Note that each group from AD can be mapped to a separate template. Click your settings ![]() icon, and then select User Templates.
icon, and then select User Templates.
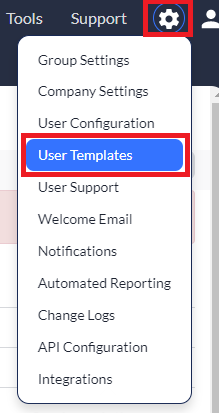
9. Click the Add new user template button to create your new template. (See User Templates for more assistance with building and editing user templates.)

10. Click the Create User Template button to save your new template.
11. We'll now create a separate account within Asset Panda that will be used solely for the AD installer. Click your settings ![]() icon, and then select User Configuration.
icon, and then select User Configuration.
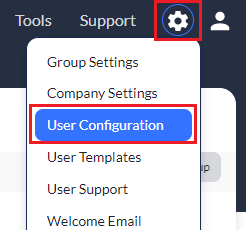
12. Click Create new user, and then enter all required information. (This account must be set as a company admin account or the sync will not work.) Note that the email does not have to be a valid email. We recommend using the following format: adsync@yourcompanyname.com.
Once you've configured Asset Panda, you're ready to install the program. Ideally, the program should be installed on a server that has continuous uptime, as it will run daily in the background, syncing new users to your system.
Active Directory Installation and Configuration
1. Click your settings ![]() icon, and then select API Configuration.
icon, and then select API Configuration.
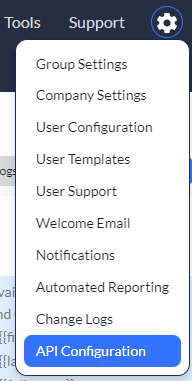
2. Complete the survey (if you haven't already), and then scroll down to API OAUTH access credentials. Copy both the Client ID and Client Secret and then paste both onto a Notepad (or similar .txt) file, and save for later. (You will need both of these in some of the steps below.)
3. Click your settings ![]() icon, click Integrations, and then select Active Directory from your integrations menu, located on the left side of your screen. (Contact Asset Panda if you do not see Active Directory within your integrations menu.)
icon, click Integrations, and then select Active Directory from your integrations menu, located on the left side of your screen. (Contact Asset Panda if you do not see Active Directory within your integrations menu.)
4. Select the Documents tab, and then click to open the Active Directory Integration Installer (shown below).
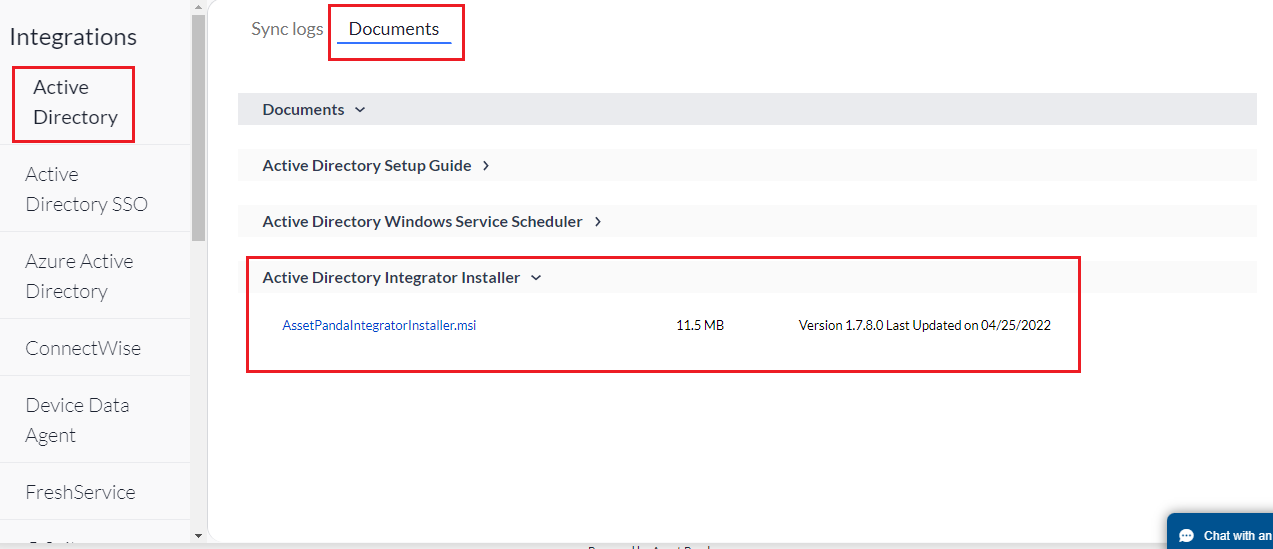
5. Click to select AssetPandaIntegratorInstaller.msi to begin the installation process.
NOTE: You must run the installer on a server that is connected to an instance of AD.
6. Select everyone when asked who you wish to install it for.
7. Once installed, the main path will be located at: C:\ProgramFiles(x86)\API\AssetPandaIntegrator\AssetPandaIntegrator.msi. Launch the program from this path.
Upon launch, you'll see the connection data screen. If the connection data section does not automatically appear, click Connect Data on the top, left side of your screen.
8. Copy and paste the Client ID (from step 2 above) into the AP Client ID field, and the Client Secret into the AP Client Secret field.
9. Copy over the AP account (created in step 12 of the Asset Panda Configuration section) to the AP Email Address, and AP Password boxes.
10. We'll now copy the first half of the AD Connection String. Open ADSI Edit on your machine (you may need to use File Explorer to search for it).
11. Right-click ADSI Edit, and then select Connect to.

12. Copy the first half of the Path (up to and including the forward slash as shown below), and then paste into your .txt file (you'll need it again in a moment).

We'll now copy the second half of the AD Connection String.
13. Open your Active Directory Users and Computers.
going to View and turning Advanced Features on. Then right clicking on your domain controller going to Properties > Attribute editor, and copying over the distinguished name.
14. Click View, and then select Advanced Features.
15. Turn these features ON.

16. Right-click on your domain controller, and then select Properties. and then Right-click on your domain controller, and then going to Properties > Attribute editor, and copying over the distinguished name.

17. Select the Attribute Editor tab, and then double-click the distinguishedName.
18. Copy the Value and then paste to your .txt file.

19. Navigate back to your Asset Panda Connection Data screen, and then copy and paste both the first and second halves of the paths from your .txt file into the AD Connection String field (make sure the first path is pasted first, with the second directly after as shown below).

20. Add your AD User Name and AD Password into their appropriate fields. Note that the account you use must have full read and write access to your AD (AD only writes to the Asset Panda folder for the purpose of creating sync logs). Also note that you should not include the pre-2000 prefix in front of the AD User Name. Input it exactly as shown in the screen above.
21. Click the Done button once you have completed the data. This begins the install process. Something is likely wrong if the installer takes more than 5 to 25 seconds to proceed. The credentials may be incorrect, network permissions may be restricted (for example, a firewall blocking outbound communication), or you may need to try running the installer as Administrator.
If you confirm that all of these settings are correct and it still does not proceed, we recommend creating a new account in AD.
The Map Groups To Entities page displays. From this page, you will select each group within AD that you wish to pull records from. You'll also choose the group you wish to send them to within Asset Panda.

22. Use the Asset Panda Group drop-down menu to select your Employees group. (Your group may be named something different than our example.)
23. Use the Active Directory Group drop-down menu to select the AD group you wish to pull over into Asset Panda.
24. If you have more than one group, click the Add Mapping button to add more.
25. Once you've selected all of the groups you wish to select, click the Edit button to map the fields to the relevant attributes. (This must be done for each of your groups.)

The table below lists some of the most common entries. If you cannot find yours here, we recommend performing an online search for a full list of AD attributes to find the one you need. Note that you will always need at least the full name field pulled over.
| Active Directory Attribute | Asset Panda Fields |
| Displayname | Name |
| Givenname | First Name |
| Sn | Last Name |
| TelephoneNumber | Phone |
| Title | Job Title |
| Department | Department |
26. Click Done when completed. This will take you back to the main screen.
27. Set the app to run an automatic sync by selecting the start time, setting the frequency, and making sure Enable Automatic Sync is toggled to ON (as shown below). Listed below are the recommended settings for this.
28. Click Start Sync once you've confirmed your settings.

29. Log in to your Asset Panda account and view your Employees group.
You will know the sync is successful if you notice that records begin to populate (may take a few minutes). You should also confirm that records are populating into the User Configuration section if you have made the decision to do so.
NOTE: All users will need to navigate to https://login.assetpanda.com, type in their email address and select the Reset Password button the first time they login. This will send a Password Reset link to their email address.
Sync Tips
The built-in scheduler will run the sync at the set time as long as a user is logged into the server. If you want to have the tool run outside of your organization's office hours when users are not logged into the server, you can download the Active Directory Windows Service Scheduler.
To download the Scheduler:
1. Click your settings ![]() icon, and then select Integrations.
icon, and then select Integrations.
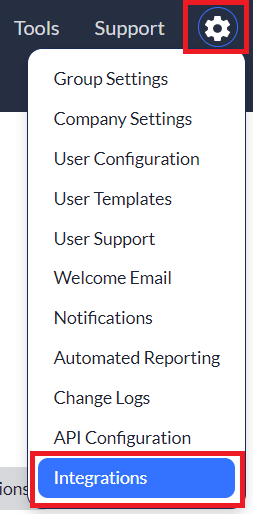
2. Select Active Directory from your integrations menu on the left side of your screen, and then click the Documents tab.
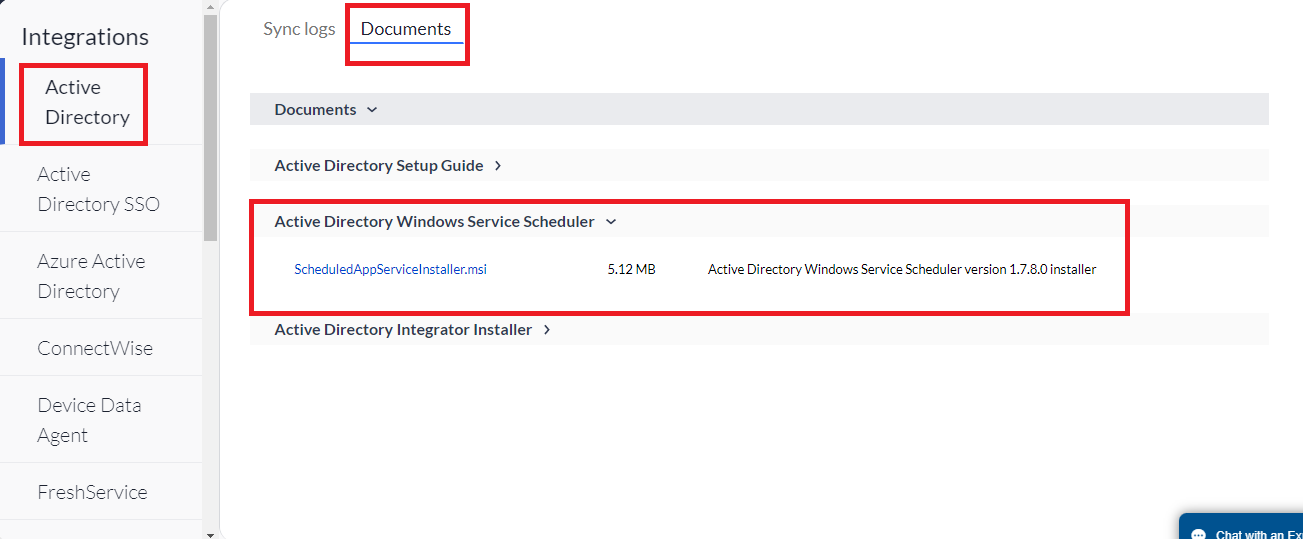
3. Open the Active Directory Windows Service Scheduler, and then click the link to begin the download.
Troubleshooting
Upgrading from older versions - If you receive an error after installing a newer version, or are unable to pull over any employees, you more than likely need to completely wipe the previous version. To do this, navigate to C:\ProgramData\AssetPanda, and delete all folders. (Note that this is a hidden location within Windows, so you may need to type the path directly in file explorer.
Incorrect email address - If the email address within User Configuration are incorrect, you'll need to modify the configuration file at C:\Program Files (x86)\API\AssetPandaIntegrator\AssetPandaIntegrator.exe.config:
- You'll find a line here that presently looks like this: <add key="userEmailField" value="" />
- Modify the line to appear as this: <add key="userEmailField" value="mail" />, and then save the file and re-launch the program.
Employees not being pulled into your group - If you do not find that employees have been pulled over after you have run the sync, we recommend you confirm that you have no required fields other than the Name field. If you do, click your settings ![]() icon, and then select Group Settings. Click the Edit link from your Assets group, and then scroll down to your fields and edit to change any that are required (other than the Name field).
icon, and then select Group Settings. Click the Edit link from your Assets group, and then scroll down to your fields and edit to change any that are required (other than the Name field).
The installer gives an error about reading mapping data, or is losing the mappings after relaunching - Right click on the installer at C:\ProgramFiles(x86)\API\AssetPandaIntegrator.msi and then navigate to Properties > compatibility. Set it to always run as admin.
Error: User mapping data not found - If you receive this error and have decided not to map user logins you do not need to worry. If however, you have mapped over users and are receiving this error, it typically means the installer does not have read access to C:\ProgramData\AssetPanda. In that case, we suggest running the program as Administrator.
Error: Invalid AD Credentials - Either the AD username and password you are using is incorrect, or the user does not have permissions to view the groups that you have selected. We suggest creating a new account in AD, and then trying again while using those new credentials.
Other issues with the installer - If you receive any other issues during the installation that you are unable to solve, please zip up the entire C:\ProgramData\AssetPanda folder and email it to support@assetpanda.com. We'll be happy to further assist you!