Edit Pinned Filters
There are lots of ways for you to edit pinned filters and we're excited to show you how.
In a hurry? Click any of the following links for quick access:
- Share a Pinned Filter
- Rename a Pinned Filter
- Set or Remove as Default
- Delete a Pinned Filter
- Change an Existing Pinned Filter
- Create from an Existing Pinned Filter
- Remove Changes to a Pinned Filter
- Clear Pinned Filters
- Edit Columns
Want to browse? Feel free to scroll through these instructions at your own leisure.
To enter the awesome world of pinned filter edits:
1. Click the Pinned Filters button.
You will notice that your default pinned filter is displayed as your pinned filters button. The blue eye  icon indicates the pinned filter you are viewing. (See Edit or Set as Default to set and/or change the default.)

2. Click the ellipses  icon next to the pinned filter you wish to edit.
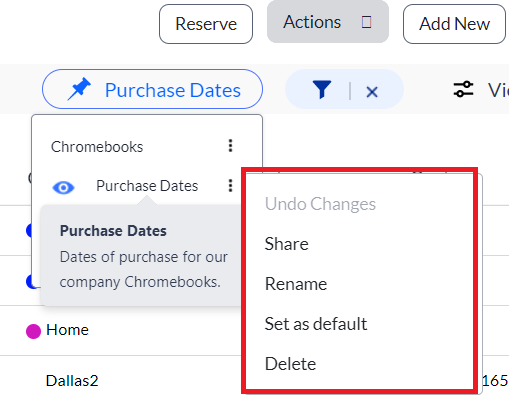
You will notice that a list of options displays allowing you to:
(See Changes to Existing Pinned Filters to add additional filtered objects to your existing filters.)
- Share - Allows you to share the filter settings with another user. This option is only available to your company administrators.
- Rename - Allows you to change the name and/or description of the pinned filter.
- Set as default - Allows you to set this specific pinned filter as your default. This filter will become the automatic default view each time you are in the system. (Can be changed at any time.)
- Delete - Allows you to completely delete the filter. It is advised that you use the option with caution because the pinned filter cannot be retrieved once it is deleted.
Share a pinned filter
You may wish to share your pinned filter(s) with another user or multiple users. The Share feature makes this simple to do.
1. Click the ellipses  icon next to the pinned filter you wish to edit.

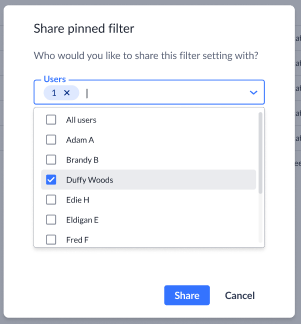
2. Select Share, and then choose the Users in you wish to share your pinned filter with.
3. Select the User templates you wish to use.
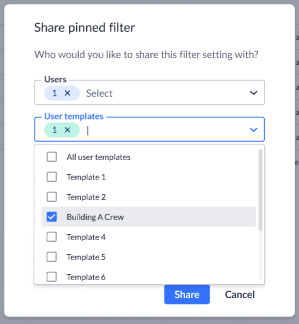
4. Click Share.
You will receive a message letting you know that your share was successful.

Something to remember. Each user is permitted to have up to 10 pinned filters at any given time. You will receive an error message if you attempt to share a pinned filter with a user who has already reached their limit.
When sharing with one user that has reached their limit:
![]()
When sharing with multiple users, only to find that one or more in the group has reached their limit:
![]()
When sharing with multiple users, only to find that all in the group have reached their limit:
![]()
Rename a pinned filter
There may be times where you wish to rename one or more of your pinned filters. The Rename feature allows you to do this quickly and easily.
1. Click the ellipses ![]() icon next to the pinned filter you wish to edit, and then select Rename.
icon next to the pinned filter you wish to edit, and then select Rename.

2. Enter the new name, and then click Save.
Set or remove a default pinned filter
You may find that you frequently use a specific pinned filter. Choosing to set that pinned filter as your default can save you time. Once set as the default, you will find that your default filter name displays in place of the Pinned filters button, and is also the first pinned filter to automatically display when viewing your pinned filters.
Set as Default
To set one of your pinned filters as the default:
Click the ellipses  icon next to the pinned filter you wish to edit, and then select Set as default.

Remove as Default
To remove a pinned filter as default:
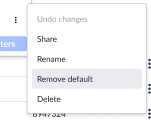
Click the ellipses  icon again, and then select Remove default.
Delete a pinned filter
You may wish to delete pinned filters that you no longer need or wish to have.
To delete a pinned filter:
1. Click the ellipses  icon next to the pinned filter you wish to edit, and then select Delete.

2. The Delete this pinned filter message displays, confirming that you wish to delete your pinned filter.
NOTE: Your deleted pinned filter is no longer retrievable once it is deleted.
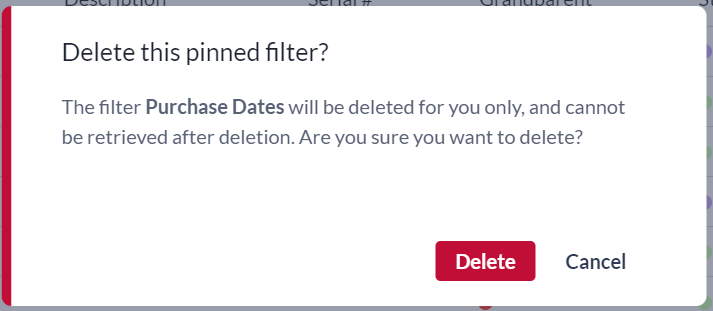
3. Select Delete.
Change an existing pinned filter
You may wish to make changes within any or all of your pinned filters. Changes such as adding to, deleting from or editing columns are all possible.
Any changes you make while viewing a pinned filter are specific to that pinned filter. You will notice when you're making changes because the pinned filter button changes to yellow.

You will also notice that a Save changes link displays next to your pinned filter button. Clicking this link ensures that you have saved your new changes.
To make changes:
1. Click the pinned filter button, and then select the pinned filter you wish to make changes to.

2. Use the filter ![]() icon to create any additional filters you wish to add to the existing pinned filter.
icon to create any additional filters you wish to add to the existing pinned filter.
Remember that the pinned filter button turns yellow, indicating that changes are being made. You will also notice another change when clicking your pinned filter button. The eye icon next to your active filter has changed from blue to yellow, indicating that change is happening.
![]()
3. Click the Save Changes link to save changes to your filter.
Your pinned filter button once again turns blue.
Create from an existing pinned filter
You can create new pinned filters from existing pinned filters. To do this:
1. Select the pinned filter you wish to use to create your new pinned filter, and make any desired changes.
2. Click your pinned filter button.
You will notice that the eye icon next to the pinned filter currently being viewed has turned yellow. This indicates that changes have been made to that specific pinned filter.
![]()
3. Click Pin current filters.
4. Enter a name and any details you wish to add to describe your new filter.
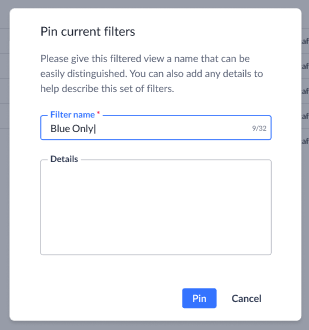
5. Click Pin.
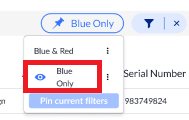
You will receive a message letting you know that your new pinned filter was successfully created, and it now displays as an option when you click your pinned filter button.
Remove changes to a pinned filter
You may find that you have made changes that you do not wish to save. To remove these changes:
NOTE: This feature is for pinned filters in which you have not yet saved your changes.
1. Click your pinned filter button.
Notice that the yellow pinned filter button and yellow eye icon indicate that you have made changes to the pinned filter currently being viewed.
![]()
and

2. Click the ellipses  icon next to the filter with the yellow eye icon, and then select Undo changes.
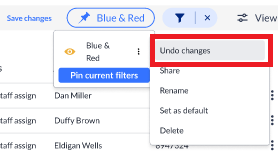
Any changes are removed and the color of your pinned filter button returns to blue. You will also notice that the Save changes link no longer displays next to your pinned filter button.

Clear pinned filters
You may wish to clear your pinned filters. Clearing your pinned filters returns your pinned filters button back to its original display and setting, rather than displaying the default or any of your other pinned filters.
NOTE: Clearing does not delete any of your pinned filters.
To clear your pinned filters:
Select, and then click the X icon next to the filter button.

The pinned filter button is cleared and once again displays as Pinned filters.

Click the Pinned filters button at any time to view or select any of your pinned filters or, to pin (create) new ones.
Edit pinned filter columns
Need more or less space in your pinned filter columns? Changing the size of your columns is as easy as moving your mouse.
1. Hover your mouse at the top, next to the name of the column you wish to resize.
You will notice that arrows display, as shown below.
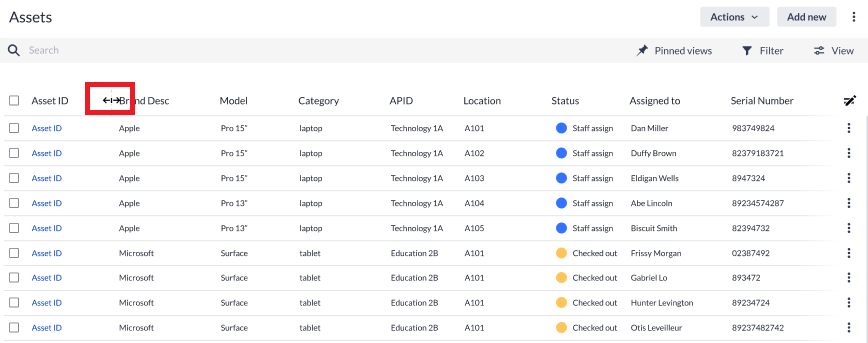
2. Drag the column until it reaches the preferred width.

That's it! Repeat for any other columns you wish to resize.